
How To
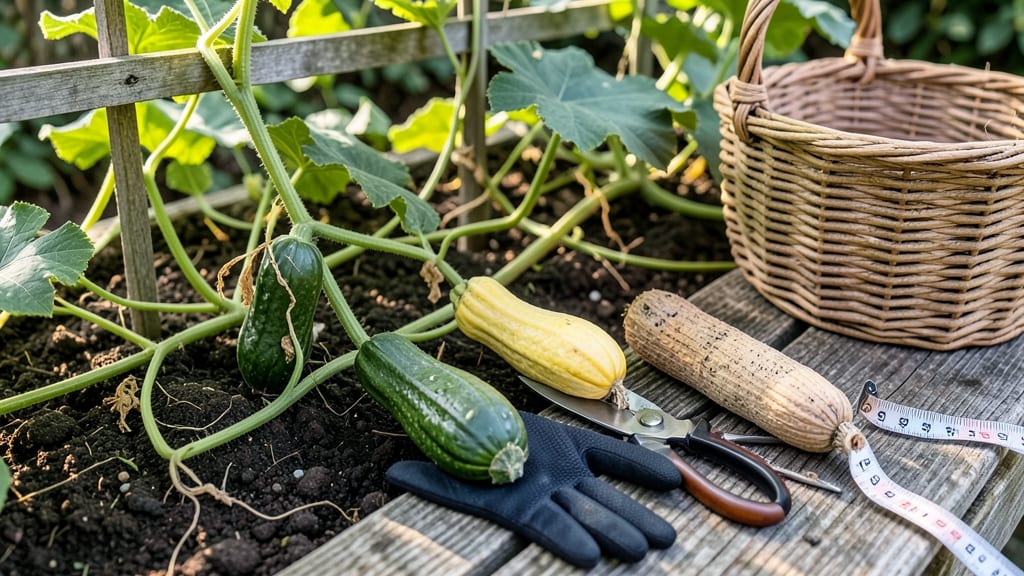
Harvesting a luffa gourd 🎋 for sponges at the right time ensures a durable, fibrous sponge instead of a bitter fruit or one that never dries properly.
Picture this: you’ve nurtured your luffa vines all season, watching them climb and produce those distinctive bumpy gourds, only to wonder, "Did I wait too long?" The difference between a perfect sponge and a wasted harvest often comes down to those final days on the vine.
In Zone 6a, where frost can sneak up by October, timing is everything. You’ll need to watch for color shifts from green to yellow, a hard rattle when shaken, and that telltale wrinkling of the skin—all signs your gourd is primed for sponge life.
Below, I’ll walk you through the three key visual cues to nail your harvest, plus how to avoid common mistakes that turn sponges into soggy disappointments.

3 Key visual signs your luffa gourd is ready for sponge harvest
Harvesting your luffa gourd at the perfect moment transforms it into a durable, natural sponge—but one wrong move can ruin your crop. The difference between success and failure often comes down to three visual cues that experienced gardeners rely on.
Ignoring these signs can leave you with a gourd that’s either too soft to use or already dried out on the vine.
Unlike harvesting for edible consumption, where you’d pick luffas when they’re still firm and green, sponge luffas need to be fully mature but not overripe. This means watching for color shifts, texture changes, and vine behavior—all of which signal the ideal harvest window.
Let’s break down the three key indicators you can’t afford to miss.
- 1 Gourd Color: Look for a shift from green to yellow or light brown. The skin should no longer be vibrant green but instead have a dull, papery finish. This indicates the flesh has fully developed and the seeds are drying inside.
- 2 Skin Texture: Press your fingernail into the gourd’s skin. If it doesn’t puncture easily and feels hard and dry (like a thick, leathery hide), it’s ready. Early harvests will yield to pressure, while overripe gourds may already feel brittle or cracked.
- 3 Stem Separation: Gently twist the stem where it attaches to the gourd. If it snaps cleanly with minimal resistance, the gourd is ready. A stubborn stem means it’s not ripe enough, while a withered, crumbly stem signals it’s past its prime.
Pro Tip: Combine these signs with the thump test—shake the gourd and listen for a hollow, rattling sound, confirming dried seeds inside.
Timing your harvest based on these visual cues ensures your luffa will develop the fibrous interior needed for sponges. Harvest too early, and you’ll end up with a gourd that’s too soft to dry properly.
Wait too long, and the fibers will break down, leaving you with a hollow shell that crumbles instead of soaking up water.
Another critical factor is the vine’s condition. Healthy vines produce the best-quality sponges, so watch for yellowing leaves or new growth slowing down. This natural die-back signals the plant is redirecting energy to mature its fruit—your cue to act quickly before frost sets in.
In USDA Zone 6a, aim to harvest by mid-October to avoid cold damage.
If you’re unsure whether your luffa is ready, harvest one test gourd and compare its texture to store-bought sponges. A properly harvested luffa should feel dense and fibrous when sliced open, with seeds that rattle freely. This hands-on approach removes guesswork and helps you refine your timing for future harvests.
Remember, post-harvest care is just as important as timing. Once you’ve picked your luffa, soak it in water for 3–5 days to remove the outer skin, then hang it in a dry, shaded area for 4–6 weeks.
Proper drying preserves the sponge’s structure, ensuring it lasts for years of reuse. Skipping these steps can leave your sponge brittle or moldy.
By mastering these three visual signs, you’ll transform your garden into a zero-waste sponge factory. The next time you spot a yellowing luffa with a leathery skin, you’ll know exactly when to reach for your pruners—and watch as your harvest turns into a sustainable, long-lasting product.
Now that you’ve identified the perfect moment to harvest, your next step is testing ripeness with the thump and twist method—a foolproof way to confirm readiness before you commit to cutting. Let’s dive into that technique next to ensure you never miss another harvest window.
How to test luffa gourd ripeness: the thump and twist method
Harvesting your luffa gourds at the perfect moment ensures you get a high-quality, durable sponge—not a bitter fruit or a brittle mess. The thump and twist method combines two simple tests to confirm ripeness without guessing.
This technique works even for beginners and eliminates the risk of overripe or underripe gourds.
First, focus on the auditory cue—the thump test. A ripe luffa should produce a hollow, echoing sound when tapped, signaling dried seeds inside. Next, use the tactile cue—the stem twist—to check for separation.
Together, these tests give you a foolproof way to know when your gourds are ready for sponge prep.
Step-by-Step: Thump and Twist Test
-
Step 1: Tap the Gourd
Hold the luffa firmly and give it a sharp tap with your knuckles. A hollow, echoing sound means the seeds are dry and the gourd is ready. A dull thud means it’s not ripe yet. -
Step 2: Check the Stem
Gently twist the stem where it connects to the gourd. If it twists off easily with a slight crack, the gourd is fully mature. Resistance means it’s not ready. -
Step 3: Inspect the Skin
Press your fingernail into the gourd’s skin. If it doesn’t puncture easily and feels hard, it’s time to harvest. Soft spots mean it needs more time. -
Step 4: Observe the Color
A ripe luffa turns yellow or light brown. Green gourds are still immature, while overly dried ones may turn gray or black.
Timing is everything when harvesting for luffa sponges. If you pick too early, the fibers won’t develop properly, and the sponge will crumble. If you wait too long, the gourd might shatter or attract pests.
The thump and twist method gives you a clear, hands-on way to avoid these pitfalls and ensure a successful harvest.
Once you’ve confirmed ripeness, harvest your luffa gourds on a dry, sunny day to prevent mold. Cut the stem with pruning shears, leaving a small attachment point. Hang them in a well-ventilated, shaded area to dry completely—this step is just as critical as the harvest itself.
Pro tip: If you’re unsure, harvest a few gourds early and let them dry. You can always test their readiness later by reapplying the thump and twist method. This way, you’ll never miss the perfect moment for a zero-waste, natural sponge.